Bind Your Own Books: 5" x 7" French Gutter with Screws by Kirsten Anderberg
Bind Your Own Books:
5" x 7" French Gutter with Screws
On this webpage, I am going to show you how to bind your own 5" x 7" book, with step by step instructions and pictures. To make these books, you will need book board (or thick card board),
nice thin paper for the covers and white paper for the inside filler paper, 2 sets of 1/4" posts and screws, a hammer and awl (to poke holes through the book board and paper), and glue/paste. (I have found spray adhesives
to be the easiest to work with.) You can obtain posts and screws, nice paper, book board, and an awl, if you need them, from the
University of Washington Book Store,
among other places. The UW Book Stores delivers. (The screws are 20 cents per screw top and bottom currently, in July 2007.)
(Picture #1) This is a picture of one piece of book board cut to measure 5 1/2" x 7 1/2" and the other piece has been cut with a 1/2" throw away piece and the other
1" piece is set next to what is left over from the piece, and you get one back cover, and one front cover, with a french gutter...
1. To begin making this book, you need to cut 2 identical pieces of book board or thick cardboard, measuring 5 1/2 " x 7 1/2". Put one of the 5 1/2" x 7 1/2" pieces aside, then cut a 1/2" x 5 1/2" piece off the end.
Throw this piece away. Now cut another 1" x 5 1/2" piece off, and you will have a piece that is 1" and another piece that is approximately 5 1/2" x 6". These two pieces will make your front cover. So at this point,
you should have 3 cut pieces of book board to work with.
(Picture #2) This is a picture of the book board cover piece on top of the cut paper for the cover.
2. Cut 2 pieces of identical paper (make sure it is thin as it will need to do a lot of bending) into rectangles measuring 6 1/2" x 8 1/2". Next cut 2 identical pieces
measuring 5" x 7" of the same paper. You now have the cover papers, for the outsides and insides of the front and back covers.
(Picture #3) This is a picture of the corner folds for the covers...
3. Place the solid cover piece of book board on one of the larger rectangles of nice paper. Make sure the nice side of the paper is facing away from the book board pasting. Glue or paste
the cover book board piece onto the paper, folding each corner up as shown in the picture above.
(Picture #4) Folding the edges over the cover book board piece...
4. Next you need to fold up the corner edges onto the cover book board, as shown in the picture above. This will give you your back cover piece. In the right lower
corner of Picture #4, you can see what happens if you do not pull the paper taut. It leaves weird gaps that are problematic. The cover paper should be taut across the board. (I only folded this
paper, so I will pull it taut when I glue it.)
5. You are going to repeat what you just did, but with the two pieces of book board to make the front cover next. First, lay out the large rectangle square of paper, with
nice side away from you facing the table. Trace a pencil outline of a 5 1/2" x 7 1/2" rectangle onto the paper you have laid out, then line up the small piece of book board
against the left side of the rectangle you drew, and place the
bigger piece of book board left against the right marking you made. The pieces should line up as in the lower part of Picture #1, but on the paper with glue behind it. Now fold
the edges up, just like you did with the back cover, but be careful not to alter the position of the two pieces of book board. You want the 2 book board pieces to equal the exact same
size as the back cover piece. You can even check out the size by placing the completed one piece cover over the two piece cover just to make sure they are the same. You will
get better at this the more you practice. So, you now have folded and glued the corners for the top cover piece, then fold the edges and glue them down, just like you did
for the back cover. You now have the front and back cover with the outer paper glued on.
6. Cut two 5"x7" pieces of the same nice paper you glued to the outside covers, and glue them over the squares left uncovered by your initial corner and edge gluing, on
the covers' insides. This will give you covers with the same paper on the front and back, inside and out.
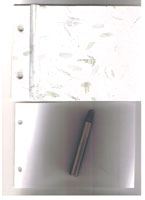
(Picture #5) This is a picture of a book with the holes punched in the covers, and white paper with holes, and an awl.
7. You need to use an awl to poke holes into the covers. You use an awl, like the metal awl above, with a hammer, to pound through both covers together, to make two holes in two cover pieces at once.
Cut a pile of 5"x7" white paper as filler paper, about 30 pages is good. Then use the awl to punch two holes spaced the same distance apart, but look at the paper, so that it does not go right to the edge of the cover,
move it in a ways to make the covers go further than the paper on the left and right and upper and lower sides. You should have about 1/2" to work with on all sides of the cover, past the
filler paper's edges.
(Picture #6) The book almost done now...
8. Unscrew the 1/4" post and screws and put the posts into the two holes in the back cover, now put the white paper on the screw posts, then put the cover on, and screw in the top of the post and screw to
finish the binding. You can see from the picture above that you will need to *straighten* the white paper inside to be properly aligned before you screw the last turns into the post.
Kirsten Anderberg. All rights reserved. For permission to reprint/publish, please contact Kirsten at kirstena@resist.ca.
 (Picture #1) This is a picture of one piece of book board cut to measure 5 1/2" x 7 1/2" and the other piece has been cut with a 1/2" throw away piece and the other
1" piece is set next to what is left over from the piece, and you get one back cover, and one front cover, with a french gutter...
(Picture #1) This is a picture of one piece of book board cut to measure 5 1/2" x 7 1/2" and the other piece has been cut with a 1/2" throw away piece and the other
1" piece is set next to what is left over from the piece, and you get one back cover, and one front cover, with a french gutter...
 (Picture #2) This is a picture of the book board cover piece on top of the cut paper for the cover.
 (Picture #3) This is a picture of the corner folds for the covers...
 (Picture #4) Folding the edges over the cover book board piece...
 (Picture #5) This is a picture of a book with the holes punched in the covers, and white paper with holes, and an awl.
 (Picture #6) The book almost done now...
 Kirsten Anderberg. All rights reserved. For permission to reprint/publish, please contact Kirsten at kirstena@resist.ca.